Start working with Paste on your Mac
Paste is a clipboard manager that works quietly in the background on your Mac, keeping track of everything you copy so you can paste it again later. Text, links, images — it’s all saved automatically, extending the system clipboard so nothing is lost when you copy something new. Paste is designed to feel like a natural part of macOS, helping you work faster without changing the way you already work.
The first time you launch Paste, a short setup helps you configure how Paste works on your Mac. You’ll choose how to open Paste, how much clipboard history it keeps, and how it integrates with macOS and other apps. You can change these settings at any time in Settings.
Using your clipboard history
With Paste, you can return to anything you’ve copied, even after it’s no longer on the system clipboard.
Open Paste using the default clipboard shortcut Shift-Command-V, or click the Paste icon in the menu bar.

Learn more about keyboard shortcuts →
Your clipboard history appears as a visual timeline, with the most recent items first. Each item shows a preview of its content, the source app, and when it was copied. This makes it easy to find what you're looking for at a glance.
Use the left and right arrow keys to move between items, or scroll with a trackpad or mouse.
Resize the Paste window to control how much content you see on screen, or switch to Compact Mode to focus on content and previews.

Paste into other apps
To paste an item into the app you're currently working in, select it in Paste and press Return, double-click it, or drag it directly into the app. Paste inserts the selected content at the current cursor position.
To paste multiple items at once, hold Command or Shift while selecting, then paste them together.
For even faster workflows, use Quick Paste by holding the Command key and pressing the number shown on an item.
For sequential pasting, use Paste Stack. Copy several items, then paste them one by one in order. Useful when filling forms, moving content between documents, or working through a list.
When formatting isn't needed, paste content as plain text, keeping only the text without styles. This is useful when working in documents, emails, or editors where formatting is already set. To paste as plain text, hold the Shift key while pasting, or choose Paste as Plain Text from the context menu.
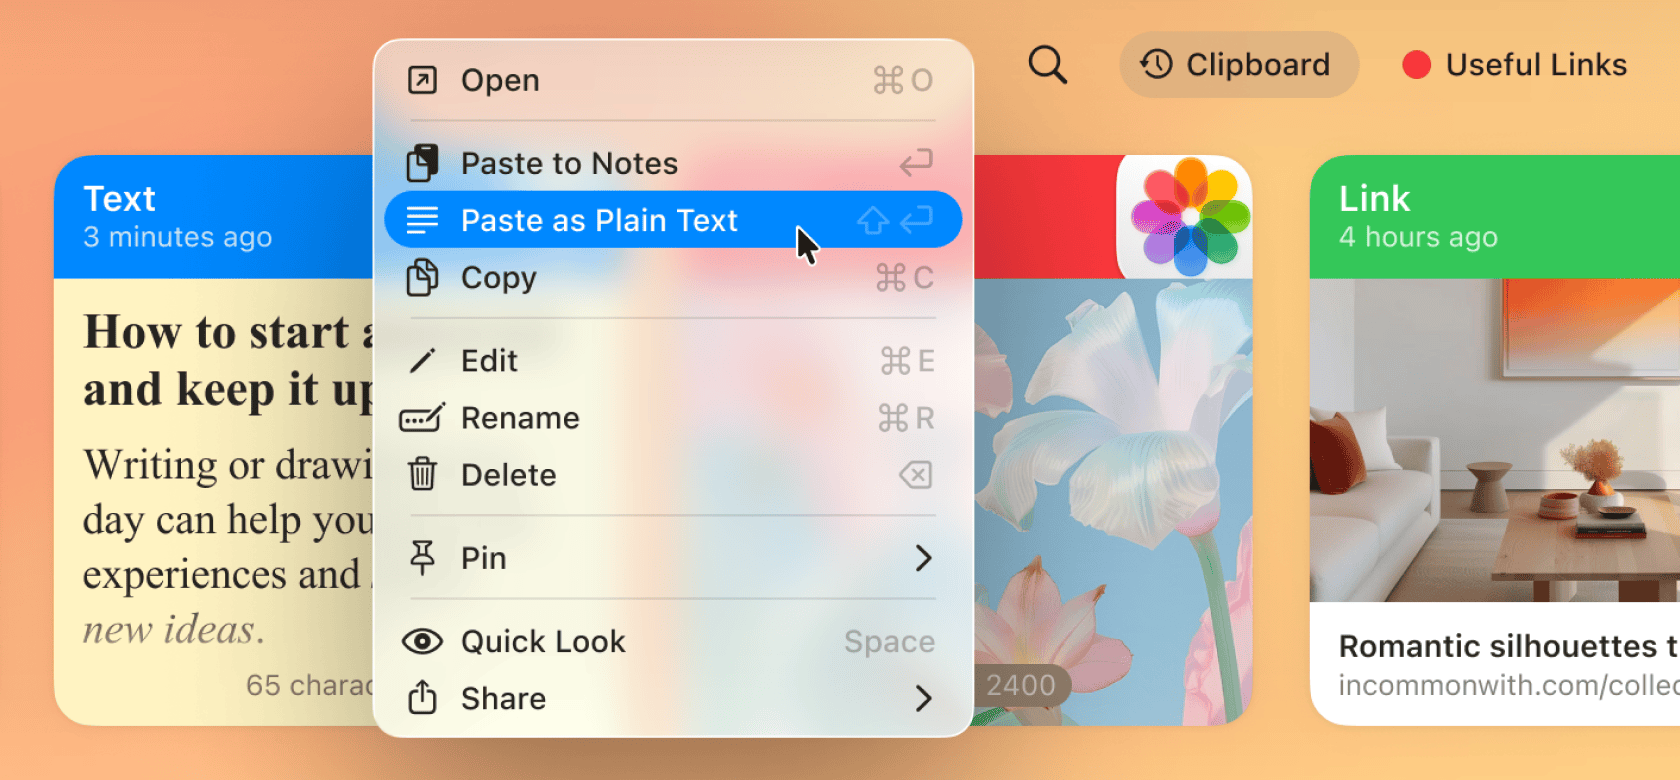
Learn more about how to paste as Plain Text →
To insert content directly at the cursor position, Paste needs accessibility permissions. Without these permissions, Paste copies the selected content to the clipboard so it can be pasted into other apps manually.
Learn more about pasting directly to other apps →
Paste works with any app where you can paste content, fitting naturally into your workflow, whether you're writing, coding, designing, or organizing notes.
Preview and edit items
When you select an item in Paste, a preview appears so you can confirm its contents before using it. In addition to the inline previews shown in the timeline, you can use the system-wide Quick Look by pressing the Space key. Quick Look opens a full preview of the selected item, letting you inspect text, images, PDFs, links, and other content types. Links open in a built-in browser, so you can preview them without leaving Paste.
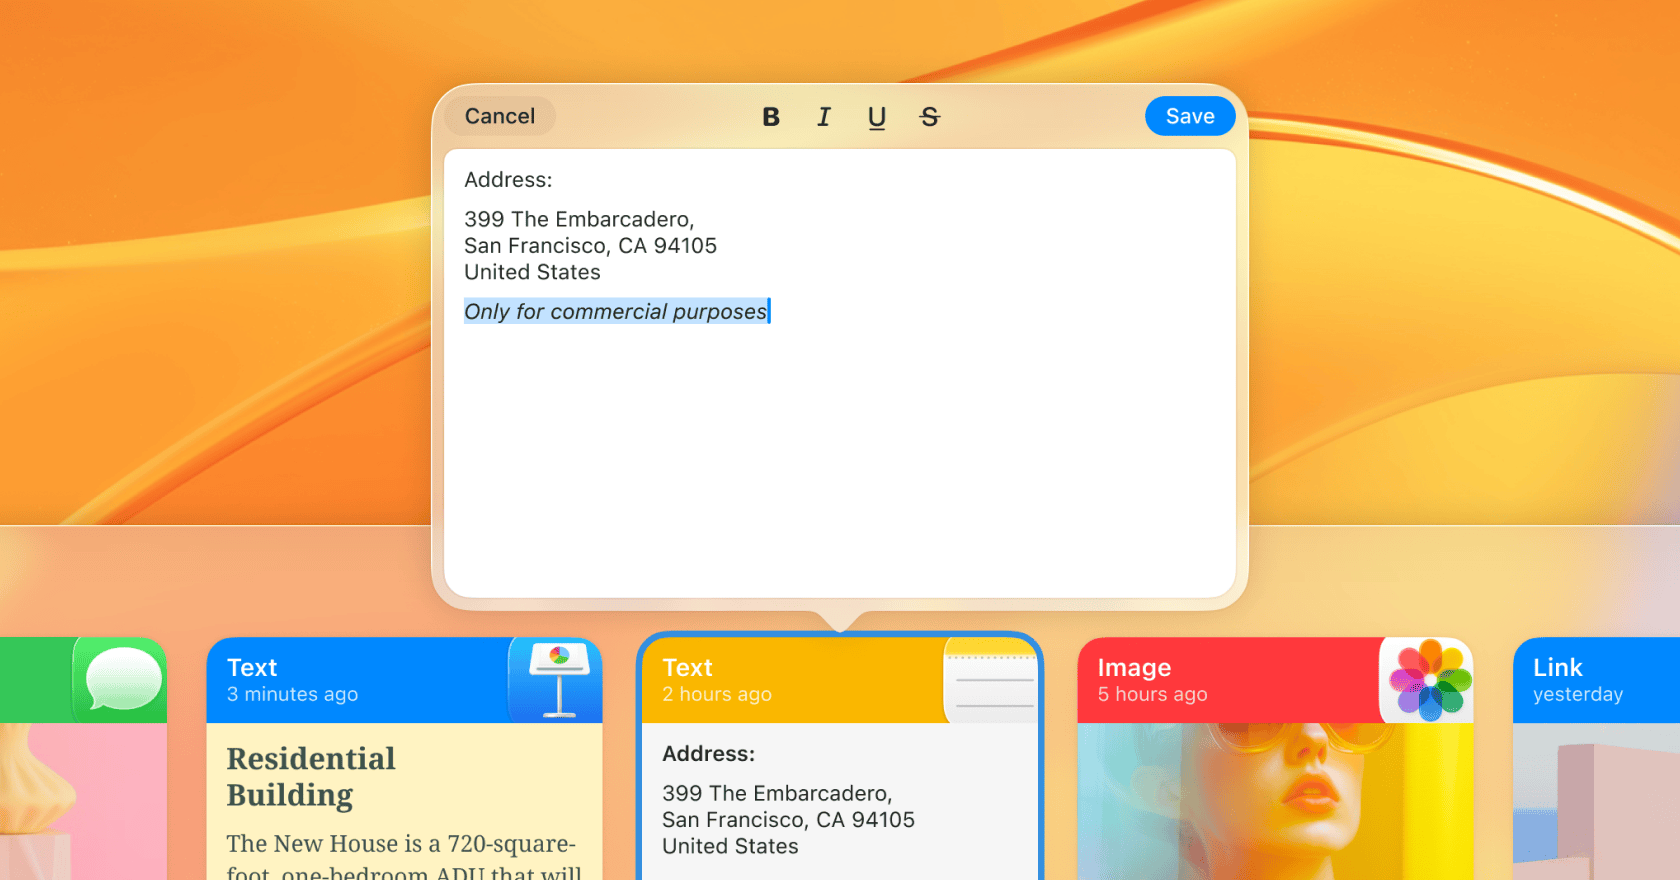
From the preview, you can edit items directly in place. You can also enter edit mode by selecting an item and pressing Command-E, or by choosing Edit from the context menu. Text items can be adjusted, cleaned up, or rewritten before pasting. Images can also be edited using quick actions, such as rotating, and you can extract text from images directly from the preview.
On devices with Apple Intelligence, Writing Tools appear while editing text, letting you refine or rewrite content before pasting.
You can rename any item to make it easier to recognize later. To rename an item, select it and press Command-R, choose Rename from the context menu, or click the title.
You can also create new items directly in Paste without copying from another app. Choose New Text Item from the main menu, or press Command-N.
Search and filter clipboard history
Paste lets you search your clipboard history across your devices, including pinned items.
When Paste is open, start typing to begin searching. You can also click the search icon in the toolbar or press Command-F to activate search. As you type, results update instantly, letting you refine your search without interrupting your flow.
Paste searches across all available information for each item, including titles, content, and other metadata. Search also works inside images, so you can find text that appears in screenshots or copied images.

To narrow results further, use filters such as content type, source app, device the content was copied on, or a date range. As you type, Paste suggests relevant filters and places them inline with your search query, where they can be adjusted or removed at any time.
To access all available filters, click the filters icon in the search bar or press Command-F again.
Navigate search results using the Right Arrow or Down Arrow keys. To move focus between the search field and the list of results, press Tab, keeping Paste fully operable from the keyboard.
Learn more about how to use search →
Organize with Pinboards
Pinboards let you save and organize content you want to keep, making it easy to return to important items. Unlike your clipboard history, which may clear over time, Pinboard items stay until you remove them.
You can create a new Pinboard by clicking the Add (+) button in the toolbar or by pressing Shift-Command-N. Give the Pinboard a name and choose a color to help distinguish it. Pinboards are useful for ongoing projects, frequently used text, links, templates, or reference material you rely on regularly.
To save an item to a Pinboard, drag it from your clipboard history onto the Pinboard, or open the item’s context menu and choose Pin.

Sync and collaborate
Paste keeps your content in sync using iCloud, so what you copy on one device is available on your other devices. This lets you move between your Mac, iPhone, and iPad while keeping your clipboard history and Pinboards up to date.
Pinboards can also be shared. Shared Pinboards let you invite others and manage access, so you can work with the same content together. When a Pinboard is shared, everyone sees the same items, and changes stay in sync automatically.
Shared Pinboards are useful when you want to keep reference material, notes, or frequently used content in one place and accessible to everyone who needs it.
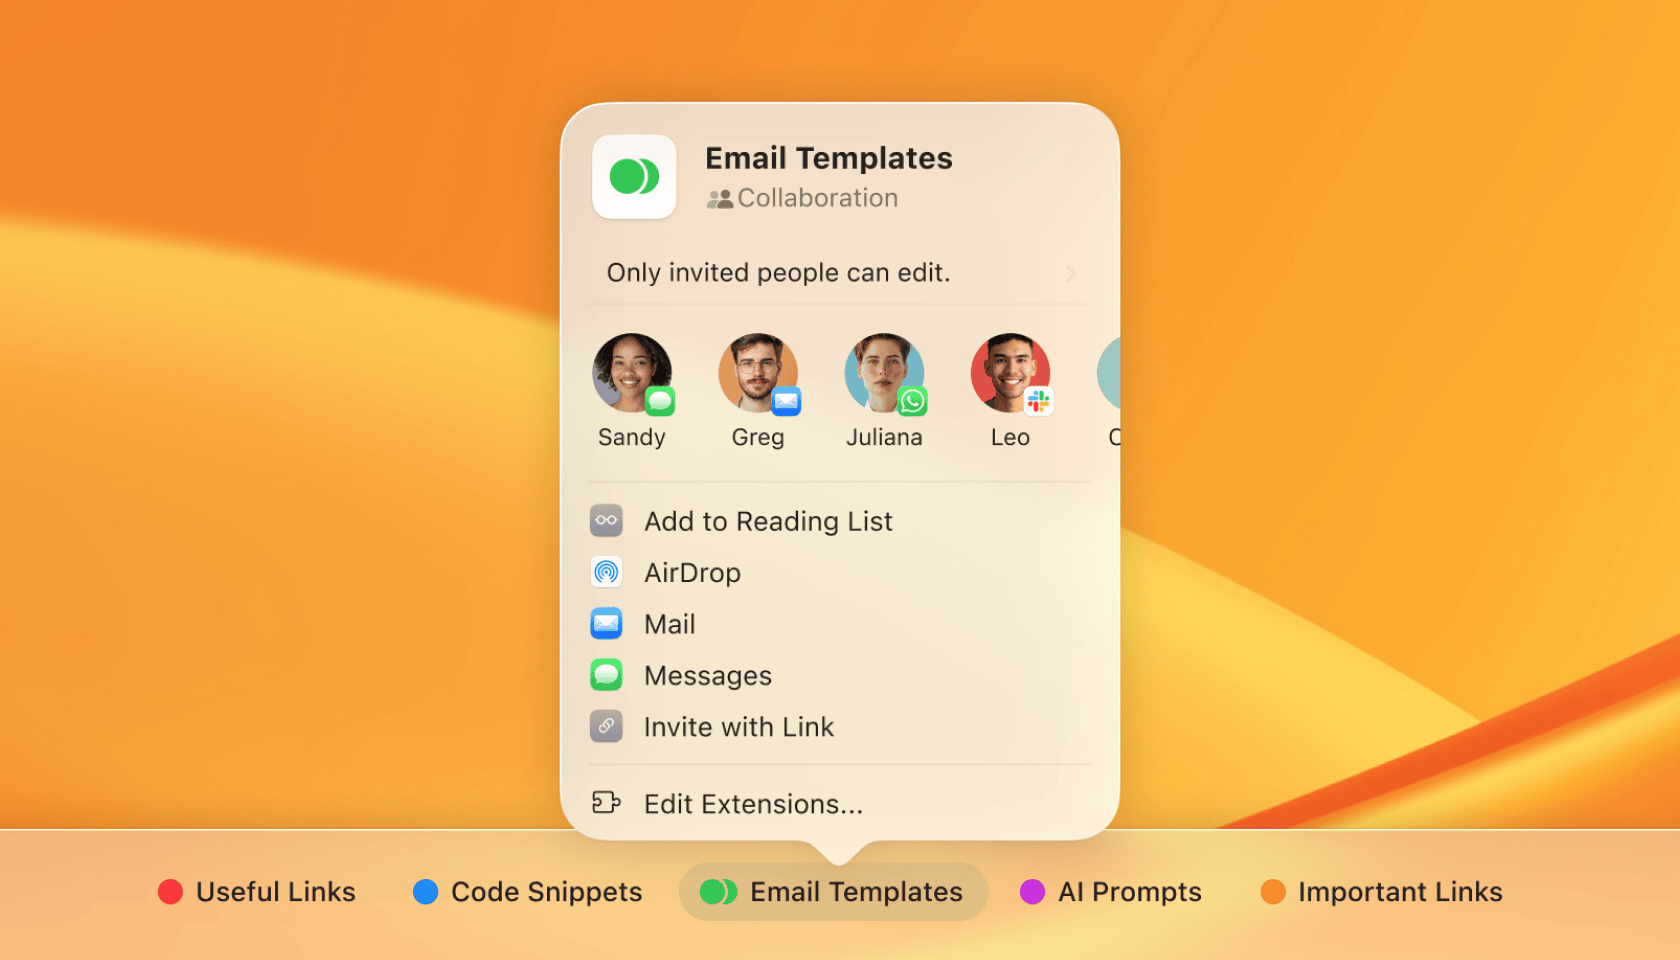
Learn more about Shared Pinboards →
Privacy and control
Paste is something you can trust. All your data is stored locally on your device and, if syncing is enabled, in your private iCloud. Your data is never sent to external servers, and nothing you copy is shared with third parties, including our team.
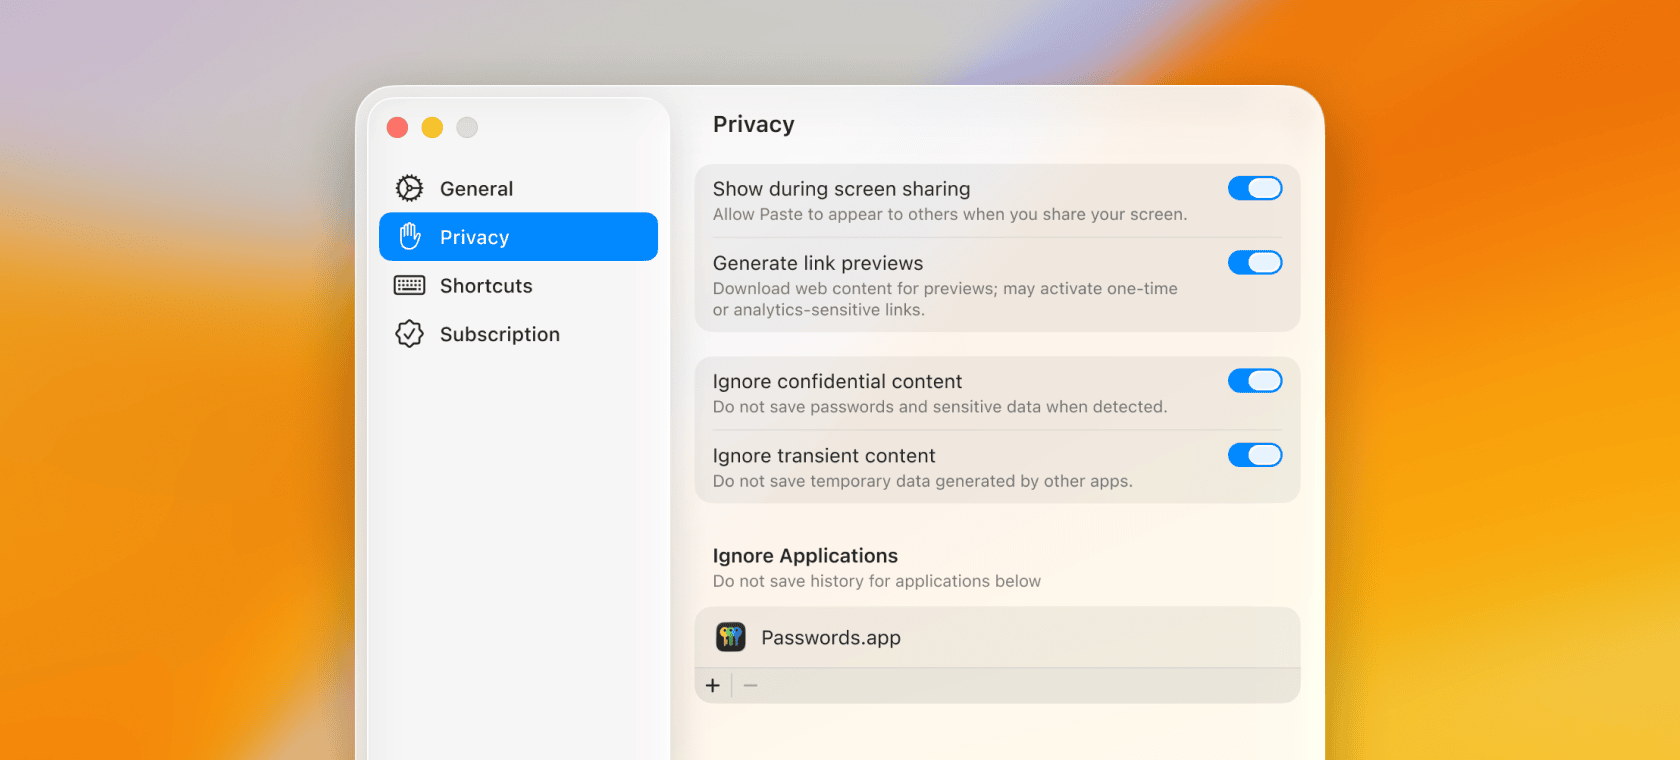
You control what Paste stores and what it doesn’t. You can ignore confidential content, prevent content from specific apps such as password managers from being saved, and adjust how long your clipboard history is kept. These settings are available in Paste Settings → Privacy.
When working with sensitive data or anything else you don't want to store, you can pause Paste temporarily. Press Command-T or choose Pause from the menu bar, then select a duration or resume manually. While paused, nothing you copy is saved in Paste.
Paste keeps your data private and under your control.
Paste is a clipboard manager that works quietly in the background on your Mac, keeping track of everything you copy so you can paste it again later. Text, links, images — it’s all saved automatically, extending the system clipboard so nothing is lost when you copy something new. Paste is designed to feel like a natural part of macOS, helping you work faster without changing the way you already work.
The first time you launch Paste, a short setup helps you configure how Paste works on your Mac. You’ll choose how to open Paste, how much clipboard history it keeps, and how it integrates with macOS and other apps. You can change these settings at any time in Settings.
Using your clipboard history
With Paste, you can return to anything you’ve copied, even after it’s no longer on the system clipboard.
Open Paste using the default clipboard shortcut Shift-Command-V, or click the Paste icon in the menu bar.

Learn more about keyboard shortcuts →
Your clipboard history appears as a visual timeline, with the most recent items first. Each item shows a preview of its content, the source app, and when it was copied. This makes it easy to find what you're looking for at a glance.
Use the left and right arrow keys to move between items, or scroll with a trackpad or mouse.
Resize the Paste window to control how much content you see on screen, or switch to Compact Mode to focus on content and previews.

Paste into other apps
To paste an item into the app you're currently working in, select it in Paste and press Return, double-click it, or drag it directly into the app. Paste inserts the selected content at the current cursor position.
To paste multiple items at once, hold Command or Shift while selecting, then paste them together.
For even faster workflows, use Quick Paste by holding the Command key and pressing the number shown on an item.
For sequential pasting, use Paste Stack. Copy several items, then paste them one by one in order. Useful when filling forms, moving content between documents, or working through a list.
When formatting isn't needed, paste content as plain text, keeping only the text without styles. This is useful when working in documents, emails, or editors where formatting is already set. To paste as plain text, hold the Shift key while pasting, or choose Paste as Plain Text from the context menu.

Learn more about how to paste as Plain Text →
To insert content directly at the cursor position, Paste needs accessibility permissions. Without these permissions, Paste copies the selected content to the clipboard so it can be pasted into other apps manually.
Learn more about pasting directly to other apps →
Paste works with any app where you can paste content, fitting naturally into your workflow, whether you're writing, coding, designing, or organizing notes.
Preview and edit items
When you select an item in Paste, a preview appears so you can confirm its contents before using it. In addition to the inline previews shown in the timeline, you can use the system-wide Quick Look by pressing the Space key. Quick Look opens a full preview of the selected item, letting you inspect text, images, PDFs, links, and other content types. Links open in a built-in browser, so you can preview them without leaving Paste.
From the preview, you can edit items directly in place. You can also enter edit mode by selecting an item and pressing Command-E, or by choosing Edit from the context menu. Text items can be adjusted, cleaned up, or rewritten before pasting. Images can also be edited using quick actions, such as rotating, and you can extract text from images directly from the preview.
On devices with Apple Intelligence, Writing Tools appear while editing text, letting you refine or rewrite content before pasting.
You can rename any item to make it easier to recognize later. To rename an item, select it and press Command-R, choose Rename from the context menu, or click the title.
You can also create new items directly in Paste without copying from another app. Choose New Text Item from the main menu, or press Command-N.

Search and filter clipboard history
Paste lets you search your clipboard history across your devices, including pinned items.
When Paste is open, start typing to begin searching. You can also click the search icon in the toolbar or press Command-F to activate search. As you type, results update instantly, letting you refine your search without interrupting your flow.
Paste searches across all available information for each item, including titles, content, and other metadata. Search also works inside images, so you can find text that appears in screenshots or copied images.

To narrow results further, use filters such as content type, source app, device the content was copied on, or a date range. As you type, Paste suggests relevant filters and places them inline with your search query, where they can be adjusted or removed at any time.
To access all available filters, click the filters icon in the search bar or press Command-F again.
Navigate search results using the Right Arrow or Down Arrow keys. To move focus between the search field and the list of results, press Tab, keeping Paste fully operable from the keyboard.
Learn more about how to use search →
Organize with Pinboards
Pinboards let you save and organize content you want to keep, making it easy to return to important items. Unlike your clipboard history, which may clear over time, Pinboard items stay until you remove them.
You can create a new Pinboard by clicking the Add (+) button in the toolbar or by pressing Shift-Command-N. Give the Pinboard a name and choose a color to help distinguish it. Pinboards are useful for ongoing projects, frequently used text, links, templates, or reference material you rely on regularly.
To save an item to a Pinboard, drag it from your clipboard history onto the Pinboard, or open the item’s context menu and choose Pin.

Sync and collaborate
Paste keeps your content in sync using iCloud, so what you copy on one device is available on your other devices. This lets you move between your Mac, iPhone, and iPad while keeping your clipboard history and Pinboards up to date.
Pinboards can also be shared. Shared Pinboards let you invite others and manage access, so you can work with the same content together. When a Pinboard is shared, everyone sees the same items, and changes stay in sync automatically.
Shared Pinboards are useful when you want to keep reference material, notes, or frequently used content in one place and accessible to everyone who needs it.

Learn more about Shared Pinboards →
Privacy and control
Paste is something you can trust. All your data is stored locally on your device and, if syncing is enabled, in your private iCloud. Your data is never sent to external servers, and nothing you copy is shared with third parties, including our team.
You control what Paste stores and what it doesn’t. You can ignore confidential content, prevent content from specific apps such as password managers from being saved, and adjust how long your clipboard history is kept. These settings are available in Paste Settings → Privacy.
When working with sensitive data or anything else you don't want to store, you can pause Paste temporarily. Press Command-T or choose Pause from the menu bar, then select a duration or resume manually. While paused, nothing you copy is saved in Paste.
Paste keeps your data private and under your control.

Paste is a clipboard manager that works quietly in the background on your Mac, keeping track of everything you copy so you can paste it again later. Text, links, images — it’s all saved automatically, extending the system clipboard so nothing is lost when you copy something new. Paste is designed to feel like a natural part of macOS, helping you work faster without changing the way you already work.
The first time you launch Paste, a short setup helps you configure how Paste works on your Mac. You’ll choose how to open Paste, how much clipboard history it keeps, and how it integrates with macOS and other apps. You can change these settings at any time in Settings.
Using your clipboard history
With Paste, you can return to anything you’ve copied, even after it’s no longer on the system clipboard.
Open Paste using the default clipboard shortcut Shift-Command-V, or click the Paste icon in the menu bar.

Learn more about keyboard shortcuts →
Your clipboard history appears as a visual timeline, with the most recent items first. Each item shows a preview of its content, the source app, and when it was copied. This makes it easy to find what you're looking for at a glance.
Use the left and right arrow keys to move between items, or scroll with a trackpad or mouse.
Resize the Paste window to control how much content you see on screen, or switch to Compact Mode to focus on content and previews.

Paste into other apps
To paste an item into the app you're currently working in, select it in Paste and press Return, double-click it, or drag it directly into the app. Paste inserts the selected content at the current cursor position.
To paste multiple items at once, hold Command or Shift while selecting, then paste them together.
For even faster workflows, use Quick Paste by holding the Command key and pressing the number shown on an item.
For sequential pasting, use Paste Stack. Copy several items, then paste them one by one in order. Useful when filling forms, moving content between documents, or working through a list.
When formatting isn't needed, paste content as plain text, keeping only the text without styles. This is useful when working in documents, emails, or editors where formatting is already set. To paste as plain text, hold the Shift key while pasting, or choose Paste as Plain Text from the context menu.

Learn more about how to paste as Plain Text →
To insert content directly at the cursor position, Paste needs accessibility permissions. Without these permissions, Paste copies the selected content to the clipboard so it can be pasted into other apps manually.
Learn more about pasting directly to other apps →
Paste works with any app where you can paste content, fitting naturally into your workflow, whether you're writing, coding, designing, or organizing notes.
Preview and edit items
When you select an item in Paste, a preview appears so you can confirm its contents before using it. In addition to the inline previews shown in the timeline, you can use the system-wide Quick Look by pressing the Space key. Quick Look opens a full preview of the selected item, letting you inspect text, images, PDFs, links, and other content types. Links open in a built-in browser, so you can preview them without leaving Paste.
From the preview, you can edit items directly in place. You can also enter edit mode by selecting an item and pressing Command-E, or by choosing Edit from the context menu. Text items can be adjusted, cleaned up, or rewritten before pasting. Images can also be edited using quick actions, such as rotating, and you can extract text from images directly from the preview.
On devices with Apple Intelligence, Writing Tools appear while editing text, letting you refine or rewrite content before pasting.
You can rename any item to make it easier to recognize later. To rename an item, select it and press Command-R, choose Rename from the context menu, or click the title.
You can also create new items directly in Paste without copying from another app. Choose New Text Item from the main menu, or press Command-N.

Search and filter clipboard history
Paste lets you search your clipboard history across your devices, including pinned items.
When Paste is open, start typing to begin searching. You can also click the search icon in the toolbar or press Command-F to activate search. As you type, results update instantly, letting you refine your search without interrupting your flow.
Paste searches across all available information for each item, including titles, content, and other metadata. Search also works inside images, so you can find text that appears in screenshots or copied images.

To narrow results further, use filters such as content type, source app, device the content was copied on, or a date range. As you type, Paste suggests relevant filters and places them inline with your search query, where they can be adjusted or removed at any time.
To access all available filters, click the filters icon in the search bar or press Command-F again.
Navigate search results using the Right Arrow or Down Arrow keys. To move focus between the search field and the list of results, press Tab, keeping Paste fully operable from the keyboard.
Learn more about how to use search →
Organize with Pinboards
Pinboards let you save and organize content you want to keep, making it easy to return to important items. Unlike your clipboard history, which may clear over time, Pinboard items stay until you remove them.
You can create a new Pinboard by clicking the Add (+) button in the toolbar or by pressing Shift-Command-N. Give the Pinboard a name and choose a color to help distinguish it. Pinboards are useful for ongoing projects, frequently used text, links, templates, or reference material you rely on regularly.
To save an item to a Pinboard, drag it from your clipboard history onto the Pinboard, or open the item’s context menu and choose Pin.

Sync and collaborate
Paste keeps your content in sync using iCloud, so what you copy on one device is available on your other devices. This lets you move between your Mac, iPhone, and iPad while keeping your clipboard history and Pinboards up to date.
Pinboards can also be shared. Shared Pinboards let you invite others and manage access, so you can work with the same content together. When a Pinboard is shared, everyone sees the same items, and changes stay in sync automatically.
Shared Pinboards are useful when you want to keep reference material, notes, or frequently used content in one place and accessible to everyone who needs it.

Learn more about Shared Pinboards →
Privacy and control
Paste is something you can trust. All your data is stored locally on your device and, if syncing is enabled, in your private iCloud. Your data is never sent to external servers, and nothing you copy is shared with third parties, including our team.
You control what Paste stores and what it doesn’t. You can ignore confidential content, prevent content from specific apps such as password managers from being saved, and adjust how long your clipboard history is kept. These settings are available in Paste Settings → Privacy.
When working with sensitive data or anything else you don't want to store, you can pause Paste temporarily. Press Command-T or choose Pause from the menu bar, then select a duration or resume manually. While paused, nothing you copy is saved in Paste.
Paste keeps your data private and under your control.

Learn more
Learn more
Learn more
© 2026 Paste Team ApS. All rights reserved.
All trademarks are the property of their respective owners.
© 2026 Paste Team ApS. All rights reserved.
All trademarks are the property of their respective owners.
© 2026 Paste Team ApS. All rights reserved.
All trademarks are the property of their respective owners.
